一键DD脚本,支持性好,更智能更全面,支持国内外各种VPS重装,特别是对国内各种访问国外资源慢的VPS安装有奇效。
安装重装系统的前提组件
Debian/Ubuntu:
apt-get install -y xz-utils openssl gawk file wget screen && screen -S os
RedHat/CentOS:
yum install -y xz openssl gawk file glibc-common wget screen && screen -S os
如果出现异常,请刷新Mirrors缓存或更换镜像源。 RedHat/CentOS:
yum makecache && yum update -y
Debian/Ubuntu:
apt update -y && apt dist-upgrade -y
一、脚本安装Linux系统
debi.sh
下载脚本:
# https://github.com/bohanyang/debi

curl -fLO https://raw.githubusercontent.com/bohanyang/debi/master/debi.sh && chmod a+rx debi.sh
运行脚本:
sudo ./debi.sh --cdn --network-console --ethx --bbr --cloud-kernel --timezone 'Asia/Shanghai' --ntp 'ntp.aliyun.com' --ssh-port 22 --mirror-host 'mirrors.ustc.edu.cn' --dns '223.5.5.5 223.6.6.6 114.114.114.114' --user root --password <新系统用户密码>说明:VPS 网络重装 Debian 11 脚本
暂不支持 Oracle Linux 作为原系统。创建新机器时请选择 Ubuntu 20.04 或 18.04 系统模板。
--bbr开启 BBR--ethx网卡名称使用传统形式,如eth0而不是ens3--cloud-kernel安装占用空间较小的cloud内核,但可能会导致 UEFI 启动的机器(如 Oracle、Azure 及 Hyper-V、Google Cloud 等)VNC 黑屏。BIOS 启动的普通 VPS 则没有此问题。- 默认时区为 UTC,添加
--timezone Asia/Shanghai可使用中国时区。 - 默认使用 Debian 官方 CDN 镜像源(deb.debian.org),添加
--china可使用阿里云镜像源。
如果没有报错可以重启:
sudo shutdown -r now约 30 秒后可以尝试 SSH 登录 installer 用户,密码与之前设置的相同。如果成功连接,可以按 Ctrl-A 然后再按 4 监控安装日志。安装完成后会自动重启进入新系统。
萌咖 InstallNET.sh
说明:
wget --no-check-certificate -qO InstallNET.sh 'https://moeclub.org/attachment/LinuxShell/InstallNET.sh' && chmod a+x InstallNET.sh
Usage:
        bash InstallNET.sh      -d/--debian [dist-name]
                                -u/--ubuntu [dist-name]
                                -c/--centos [dist-version]
                                -v/--ver [32/i386|64/amd64]
                                --ip-addr/--ip-gate/--ip-mask
                                -apt/-yum/--mirror
                                -dd/--image
                                -a/-m

# dist-name: 发行版本代号
# dist-version: 发行版本号
# -apt/-yum/--mirror : 使用定义镜像
# -a/-m : 询问是否能进入VNC自行操作. -a 为不提示(一般用于全自动安装), -m 为提示.
安装debian
安装debian9 (-firmware 额外驱动支持)
bash <(wget --no-check-certificate -qO- 'https://moeclub.org/attachment/LinuxShell/InstallNET.sh') -d 9 -v 64 -a -firmware

#自定义密码安装Debian 10
bash <(wget --no-check-certificate -qO- 'https://moeclub.org/attachment/LinuxShell/InstallNET.sh') -d 10 -v 64 -a -firmware -p mima.123

#自定义密码和端口安装Debian 11
bash <(wget --no-check-certificate -qO- 'https://raw.githubusercontent.com/MoeClub/Note/master/InstallNET.sh') -d 11 -v 64 -p 自定义root密码 -port 自定义ssh端口

#低于512MB内存安装Debian 11
wget https://raw.githubusercontent.com/Erope/VNCReInstall/main/InstallNET_debian.sh
bash InstallNET_debian.sh -d 11 -v 64 --ip-addr --ip-gate --ip-mask -p 自定义root密码

#使用默认镜像全自动安装
bash InstallNET.sh -d 8 -v 64 -a

#安装最新 Debian 11 “bullseye”
# -p 参数后为默认root用户密码,SSH端口为22

##海外源:
bash <(wget --no-check-certificate -qO- 'https://raw.githubusercontent.com/MoeClub/Note/master/InstallNET.sh') -d 11 -v 64 -a -firmware -p mima.123

##国内源:
bash <(wget --no-check-certificate -qO- 'https://file.geekn.net/CNODnjau/InstallNET.sh') -d 11 -v 64 -a -firmware -p mima.123 --mirror 'https://mirrors.huaweicloud.com/debian/'

#国内推荐使用USTC源
--mirror 'http://mirrors.ustc.edu.cn/debian/'
安装Centos
wget --no-check-certificate -qO InstallNET.sh 'https://moeclub.org/attachment/LinuxShell/InstallNET.sh' && chmod a+x InstallNET.sh

#全自动安装CentOS 6.10 64位
bash InstallNET.sh -c 6.10 -v 64 -a --mirror 'http://mirror.centos.org/centos'

#全自动安装CentOS 7 64位(目前该脚本不支持)
bash InstallNET.sh -c 7 -v 64 -a --mirror 'http://mirror.centos.org/centos'
安装ubuntu
wget --no-check-certificate -qO InstallNET.sh 'https://moeclub.org/attachment/LinuxShell/InstallNET.sh' && chmod a+x InstallNET.sh

#全自动安装ubuntu 16.10 64位
bash InstallNET.sh -d 16.10 -v 64 -a --mirror 'http://archive.ubuntu.com/ubuntu/'

#全自动安装ubuntu 18.10 64位
bash InstallNET.sh -u 18.10 -v 64 -a --mirror 'http://archive.ubuntu.com/ubuntu/'
安装Windows
wget --no-check-certificate -qO InstallNET.sh 'https://moeclub.org/attachment/LinuxShell/InstallNET.sh' && bash InstallNET.sh -dd '[Windows dd包直连地址]'二、一键脚本
AutoDD.sh
AutoReinstall.sh的脚本暂时未支持一键安装CentOS 7(截止2019年8月作者暂未更新),我们可以使用以下命令来安装:
wget --no-check-certificate -qO AutoDD.sh 'http://git.io/autodd.sh' && bash AutoDD.sh然后我们就可以选择CentOS7/Debian9/Ubuntu16.04系统。
AutoReinstall.sh
wget --no-check-certificate -O AutoReinstall.sh https://git.io/betags && chmod a+x AutoReinstall.sh && bash AutoReinstall.sh

#国内脚本
wget --no-check-certificate -O AutoReinstall.sh https://cdn.jsdelivr.net/gh/fcurrk/reinstall@master/AutoReinstall.sh && chmod a+x AutoReinstall.sh && bash AutoReinstall.sh

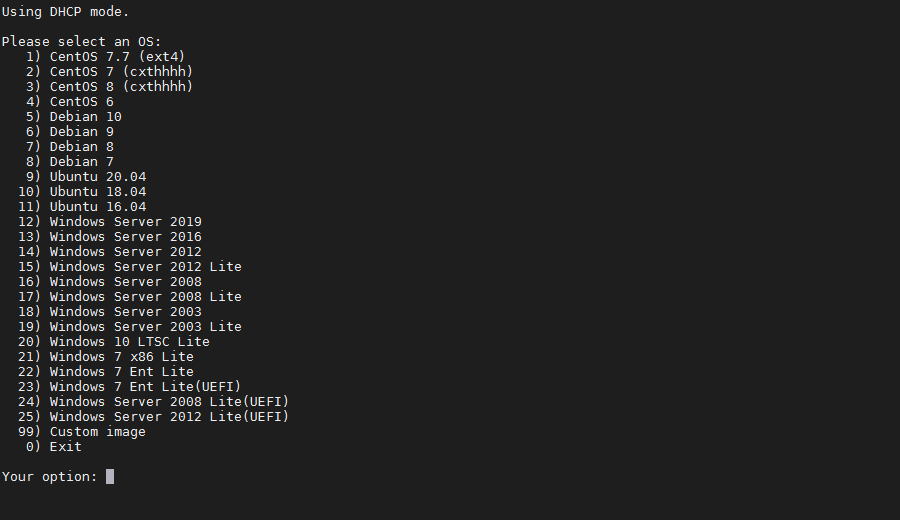
25合一系统密码:
1、CentOS 7.7 (已关闭防火墙及SELinux,默认密码Pwd@CentOS)
2、CentOS 7 (默认密码cxthhhhh.com)
3、CentOS 8 (默认密码cxthhhhh.com)
4、CentOS 6 (默认密码Minijer.com)
5、Debian 10 (默认密码Minijer.com)
6、Debian 9 (默认密码Minijer.com)
7、Debian 8 (默认密码Minijer.com)
8、Debian 7 (默认密码Minijer.com)
9、Ubuntu 20.04 (默认密码Minijer.com)
10、Ubuntu 18.04 (默认密码Minijer.com)
11、Ubuntu 16.04 (默认密码Minijer.com)
12、Windows Server 2019 (默认密码cxthhhhh.com)
13、Windows Server 2016 (默认密码cxthhhhh.com)
14、Windows Server 2012 (默认密码cxthhhhh.com)
15、Windows Server 2012 Lite (默认密码nat.ee)
16、Windows Server 2008 (默认密码cxthhhhh.com)
17、Windows Server 2008 Lite (默认密码nat.ee)
18、Windows Server 2003 (默认密码cxthhhhh.com)
19、Windows Server 2003 Lite (默认密码WinSrv2003x86-Chinese)
20、Windows 10 LTSC Lite (默认密码www.nat.ee)
21、Windows 7 x86 Lite (默认密码Windows7x86-Chinese)
22、Windows 7 Ent Lite (默认密码nat.ee)
23、Windows 7 Ent Lite (UEFI支持甲骨文)(默认密码nat.ee)
24、Windows Server 2008 Lite (UEFI支持甲骨文)(默认密码nat.ee)
25、Windows Server 2012 Lite (UEFI支持甲骨文)(默认密码nat.ee)
99、自定义镜像
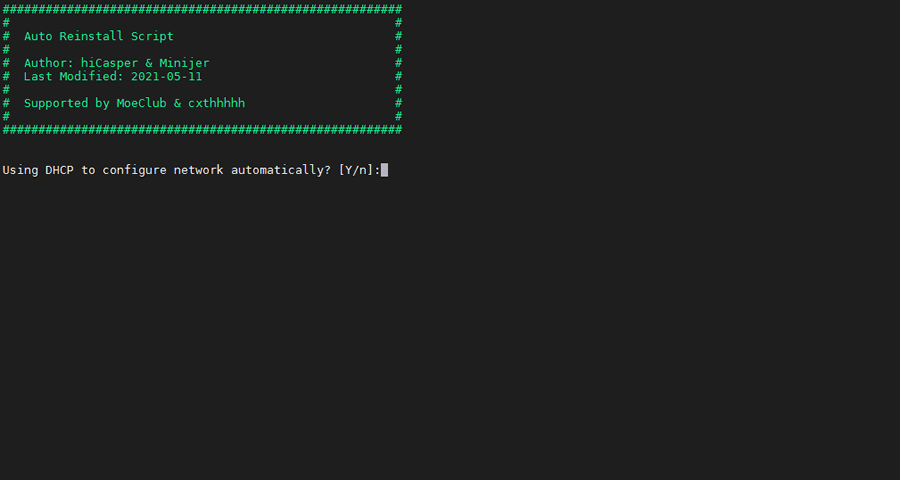
输入Y确认DD后主机自动获取IP,N则自行设置IP 输入N后会自动检测出主机现用IP,如果正确可以按Y确认使用,如不正确则按N自行按正确的输入。
 25合1的系统一键DD选择界面,输入99则使用自定义镜像。 以上系统密码不为默认密码的均为网络收集,如有疑虑使用自己的自定义镜像。
dd-od.sh
#镜像文件在OneDrive
wget -N --no-check-certificate https://raw.githubusercontent.com/veip007/dd/master/dd-od.sh && chmod +x dd-od.sh && ./dd-od.sh

#镜像文件在GoogleDrive
wget -N --no-check-certificate https://raw.githubusercontent.com/veip007/dd/master/dd-gd.sh && chmod +x dd-gd.sh && ./dd-gd.sh

请选择您需要的镜像包:
  1) CentOS 7 (DD) 用户名:root 密码:Pwd@CentOS
  2) CentOS 6 (阿里云镜像) 用户名:root 密码:MoeClub.org
  3) CentOS 6 用户名:root 密码:MoeClub.org
  4) Debian 7 x32 用户名:root 密码:MoeClub.org
  5) Debian 8 x64 用户名:root 密码:MoeClub.org
  6) Debian 9 x64 用户名:root 密码:MoeClub.org
  7) Debian 10 x64 用户名:root 密码:cxthhhhh.com
  8) Ubuntu 14.04x64 用户名:root 密码:MoeClub.org
  9) Ubuntu 16.04x64 用户名:root 密码:MoeClub.org
  10) Ubuntu 18.04x64 用户名:root 密码:MoeClub.org
  11) 萌咖Win7x64 用户名:Administrator  密码:Vicer
  12) Win2019 By:MeowLove  密码:cxthhhhh.com
  13) Win2016 By:MeowLove  密码:cxthhhhh.com
  14) Win2012 R2 By:MeowLove  密码:cxthhhhh.com
  15) Win2008 R2 By:MeowLove  密码:cxthhhhh.com
  16) Windows 7 Vienna By:MeowLove  密码:cxthhhhh.com
  17) Windows 2003 Vienna By:MeowLove  密码:cxthhhhh.com
  18) Win7x32 By:老司机  用户名:Administrator  密码:Windows7x86-Chinese
  19) Win-2003x32 By:老司机  用户名:Administrator  密码:WinSrv2003x86-Chinese
  20) Win2008x64 By:老司机  用户名:Administrator  密码:WinSrv2008x64-Chinese
  21) Win2012R2x64 By:老司机  用户名:Administrator  密码:WinSrv2012r2
  22) CentOS 8 用户名:root 密码:cxthhhhh.com 推荐512M以上使用
  自定义安装请使用:bash InstallNET.sh -dd '您的直连'
 请输入编号:
阿里云专用DD脚本
Linux用户名:root
Windows用户名:Administrator
默认密码 cxthhhhh.com

wget --no-check-certificate https://shell.p1e.cn/reinstall/Network-Reinstall-System-Modify.sh && chmod a+x Network-Reinstall-System-Modify.sh

安装Linux系统
#一键网络重装纯净 CentOS 8
bash Network-Reinstall-System-Modify.sh -CentOS_8
#一键网络重装纯净CentOS 7
bash Network-Reinstall-System-Modify.sh -CentOS_7
#一键网络重装纯净CentOS 6
bash Network-Reinstall-System-Modify.sh -CentOS_6

#一键网络重装纯净Debian 9
bash Network-Reinstall-System-Modify.sh -Debian_9
#一键网络重装纯净Debian 8
bash Network-Reinstall-System-Modify.sh -Debian_8
#一键网络重装纯净Debian 7
bash Network-Reinstall-System-Modify.sh -Debian_7

#一键网络重装纯净Ubuntu 18.04
bash Network-Reinstall-System-Modify.sh -Ubuntu_18.04
#一键网络重装纯净Ubuntu 16.04
bash Network-Reinstall-System-Modify.sh -Ubuntu_16.04
#一键网络重装纯净Ubuntu 14.04
bash Network-Reinstall-System-Modify.sh -Ubuntu_14.04

安装Windows系统
#一键网络重装纯净Windows Server 2019
bash Network-Reinstall-System-Modify.sh -Windows_Server_2019
#一键网络重装纯净Windows Server 2016
bash Network-Reinstall-System-Modify.sh -Windows_Server_2016
#一键网络重装纯净Windows Server 2012 R2
bash Network-Reinstall-System-Modify.sh -Windows_Server_2012R2
#一键网络重装纯净Windows Server 2008 R2
bash Network-Reinstall-System-Modify.sh -Windows_Server_2008R2
#一键网络重装纯净Windows 7
bash Network-Reinstall-System-Modify.sh -Windows_7_Vienna
#一键网络重装纯净Windows Server 2003
bash Network-Reinstall-System-Modify.sh -Windows_Server_2003
network-reinstall-os.sh
默认账户名为:root,密码为:IdcOffer.com。

wget -N --no-check-certificate https://down.vpsaff.net/linux/dd/network-reinstall-os.sh && \
chmod +x network-reinstall-os.sh && ./network-reinstall-os.sh

##############################################################
#                                                            #
#  Network reinstall OS                                      #
#                                                            #
#  Last Modified: 2022-02-18                                 #
#  Linux默认密码:IdcOffer.com                               #
#  Supported by idcoffer.com                                 #
#                                                            #
##############################################################
IP: XXX.XXX.XXX.XXX/24
网关: 173.230.137.1
网络掩码: 255.255.255.0
请选择您需要的镜像包:
  0) 升级本脚本
  1) Debian 9(Stretch) 用户名:root 密码:IdcOffer.com
  2) Debian 10(Buster) 用户名:root 密码:IdcOffer.com
  3) Debian 11(Bullseye)用户名:root 密码:IdcOffer.com ,推荐1G内存以上使用
  4) CentOS 7 x64 (DD) 用户名:root 密码:Pwd@CentOS
  5) CentOS 8 x64 (DD) 用户名:root 密码:cxthhhhh.com 推荐512M内存以上使用
  6) CentOS 7 用户名:root 密码:IdcOffer.com, 要求2G RAM以上才能使用
  7) CentOS 8 (EFI 引导) 用户名:root 密码:IdcOffer.com, 要求2G RAM以上才能使用
  8) Ubuntu 16.04 LTS (Xenial Xerus) 用户名:root 密码:IdcOffer.com
  9) Ubuntu 18.04 LTS (Bionic Beaver) 用户名:root 密码:IdcOffer.com
  10) Ubuntu 20.04 LTS (Focal Fossa) 用户名:root 密码:IdcOffer.com ,推荐2G内存以上使用
  11) Fedora 32 用户名:root 密码:IdcOffer.com, 要求2G RAM以上才能使用
  12) Fedora 33 用户名:root 密码:IdcOffer.com, 要求2G RAM以上才能使用
  13) Fedora 34 用户名:root 密码:IdcOffer.com, 要求2G RAM以上才能使用
  14) Fedora 35 用户名:root 密码:IdcOffer.com, 要求2G RAM以上才能使用
  15) RockyLinux 8 用户名:root 密码:IdcOffer.com, 要求2G RAM以上才能使用
  16) AlmaLinux 8 用户名:root 密码:IdcOffer.com, 要求2G RAM以上才能使用
  自定义安装请使用:bash network-reinstall.sh -dd '您的直连'
三、DD镜像:
Windows
#80host DD包
http://down.80host.com/iso/dd/WS2008R2Enterprise-Joodle-Template.gz
http://down.80host.com/iso/dd/Windows2012R2-Joodle-Template.gz
Username:Administrator
Password:Password147
http://down.80host.com/iso/dd/Windows7-Joodle-Template.gz
http://down.80host.com/iso/dd/Windows8.1-Joodle-Template.gz
Username:Admin
Password:Password147
http://down.80host.com/iso/dd/7.ENT.EVAL.64.VIRTIO-SCSI.gz
Username:WhatUpTime.com
Password:P@ssword64
http://down.80host.com/iso/dd/win7_cn_5gb_virtio_scsi.gz
Username:administrator
Password:www.80host.com
#支持OVH VPS的scsi磁盘驱动,其他viostor的DD包在上面会蓝屏
http://down.80host.com/iso/dd/win7_cn_5gb_virtio_scsi_faster.gz
Username:administrator
Password:www.80host.com
#支持OVH VPS的scsi磁盘驱动,其他viostor的DD包在上面会蓝屏
http://down.80host.com/iso/dd/Kimsufi2003.gz
Username:Administrator
Password:password!yxz.me
http://down.80host.com/iso/dd/win2003_with_update.gz
Username:administrator
Password:80hostkvmlamjj
http://down.80host.com/iso/dd/ikoula92.gz
Username:administrator
Password:Abcd123400

#Laiboke.com制作的中文版2012R2
http://down.80host.com/iso/dd/Win2012R2ZW.gz
Username:Administrator
Password:Laiboke.com

#moerats.com提供
账号: Administrator
密码: Vicer
#Windows Embedded 8.1 Industry Pro x64 (2.87G;KVM;XEN;Hyper-V;未激活)
https://moeclub.org/get-win8embx64-auto
#备用地址
https://down.moerats.com/Windows/win8embx64-auto.gz
#谷歌文件ID: 1srhylymTjYS-Ky8uLw4R6LCWfAo1F3s7
#该包只添加了VirtIO驱动,理论上仅能在KVM,Hyper-V构架下正常运行.
#如需在其他虚拟化构架下运行,请自行添加相关虚拟化驱动.
#使用的是Windows Embedded Standard 7(Thin PC)作为底包,官方精简
https://moeclub.org/onedrive/IMAGE/Windows/win7emb_x86.tar.gz

#teddysun.com/545.html提供
#镜像具备以下特点
#1,集成 virtio 驱动以及 Intel 的网卡驱动,因此适用于大部分 KVM 的 VPS 以及 Kimsufi 服务器
#2,无需 VNC 交互直接无人值守安装,DD 完成即可远程登录桌面
#3,基于 VOL 版制作,因此可用 KMS 方式激活系统
#4,关闭 Ctrl + Alt + Del 快捷键登录方式
#5,关闭服务器管理器开机自启动
#6,关闭 IE 安全增强配置
#7,开启 Windows 远程桌面
#8,关闭 Windows 自带防火墙
#9,其他基于 Dism++ 自带的一些系统优化,如去掉快捷方式小箭头等

/用户名: administrator
/密码: Password147

https://delivery.yuntu.moe/teddysun/cn_windows2019.gz
https://delivery.yuntu.moe/teddysun/en_windows2019.gz

https://delivery.yuntu.moe/teddysun/cn_windows2016.gz
https://delivery.yuntu.moe/teddysun/en_windows2016.gz

https://delivery.yuntu.moe/teddysun/cn_windows2012r2.gz
https://delivery.yuntu.moe/teddysun/en_windows2012r2.gz
四、其他问题
安装时出现“Not Found grub”或者VNC提示“Low memory mode”,可尝试以下脚本:
wget https://github.com/zhucaidan/InstallNET/raw/main/InstallNET.Legacy.sh

bash InstallNET.Legacy.sh -d 10 -v 64 --ip-addr IP地址 --ip-gate 网关 --ip-mask 子网掩码 -p 密码 -a
某些服务商会设置错误的IPV6自动获取导致无法更新,下面方法可以关闭系统的IPV6:
编辑 nano /etc/sysctl.conf 文件,在文件的最末尾添加下面的文本:

net.ipv6.conf.all.disable_ipv6 = 1

退出nano编辑器后,让刚刚的系统命令生效在SSH中输入:

sysctl -p
注意: 经测试在谷歌云原版系统基础上DD会出现自动获取的子网掩码为255.255.255.255,如出现这种情况需要手工输入改正为正确的如255.255.255.0,否则会安装完成主机可能会离线。 Oracle Cloud(甲骨文云)可选择23-25一键DD,注意基础系统最好选择Ubuntu,如原系统是CentOS可能无法成功。
特别感谢:Vicer、cxt、hiCasper等各位技术大佬的脚本,站长只是脚本的”搬运工”。


